
How to use Liscaragh Migrate
Liscaragh Migrate copies data from a supported source into Microsoft 365 (SharePoint Online or OneDrive for Business), directly, with a full per-file record of what happened. This guide walks through a migration from start to finish, then explains every setting.
Related guides
- How to use: Datto Workplace source
- How to use: files and folders source
- Datto Workplace API setup (connecting the tool to Datto Workplace)
- Microsoft 365 setup (the app registration and certificate)
- Understanding your audit trail and reports
- Completion certificates and provenance packs
- What happens when files fail, and how to fix it
- What the readiness grade actually measures
- Scheduling a migration around a working office
Before you begin
Liscaragh Migrate connects to your source and to Microsoft 365 once per computer, under Settings > API settings. Every job on that computer then reuses the same connection settings. Until that connection is set up, nothing can run.
What connecting the source involves depends on which source you are using:
- Datto Workplace. Needs a one-off API setup: an API client ID and secret from Datto, entered once. See Datto Workplace API setup.
- Files and folders. There is no API to set up. Point the tool at a local drive or a network path and it reads it the same way Windows Explorer would. If the account running the tool already has access, there is nothing further to do; if the share needs a different sign-in, store it once in Windows Credential Manager. See files and folders source and how we store your credentials.
Whichever source you use, the Microsoft 365 side of the connection is the same: see Microsoft 365 setup.
That sign-in needs to be a Global Administrator, or an account holding roles that can both create app registrations and grant admin consent to them. This is a Microsoft 365 requirement for what the wizard does, not something the tool adds on top. If you are not comfortable granting that sign-in, the manual path in the Microsoft 365 setup guide lets your Microsoft 365 admin do the app registration and permission grant themselves, then hand you the details to enter.
Important reading before your first migration
Two short pages cover things every migration runs into. They are not optional background reading, they explain limits and responsibilities that shape how you plan a job.
API throttling and bandwidth limits: why a migration's speed is set by Datto's and Microsoft's own rate limits, not by your internet connection, and what that means for planning a large job.
What we expect from you: the backups, testing and permissions the EULA requires before you migrate, including the on-screen checklist the tool asks you to confirm.
The migration, step by step
-
Install and open the tool
Run the installer and open Liscaragh Migrate from the desktop shortcut. The installer only prepares the machine. It asks for no passwords and handles no certificates.
-
Connect your source and Microsoft 365
Open Settings > API settings and configure your source and Microsoft 365 connection. Use Test connection: both sides should report OK before you continue. The two setup guides above cover exactly what to enter, step by step.
-
Add your licence (optional to start)
If you have a licence file, install it under Help > Install licence file. You can do everything except a full copy without one, so it is fine to explore first and licence when you are ready.
-
Create a job
Job > New, and give the job a name you will recognise later. A job keeps its own mapping, logs, reports and state, so several migrations never interfere with each other. The connection set up on the computer is reused automatically.
-
Choose what to copy and where it lands
Pick an item on the left (a Datto Workplace project, or a folder for a files-and-folders source). On the right, choose the destination: a SharePoint site and library, or a person's OneDrive. Use Browse to drill into existing folders or create a new one. Optionally set a Source subfolder to copy just part of the item. Click Apply to this project, and repeat for each item you are migrating. The green lines confirm exactly where files will land before anything runs.
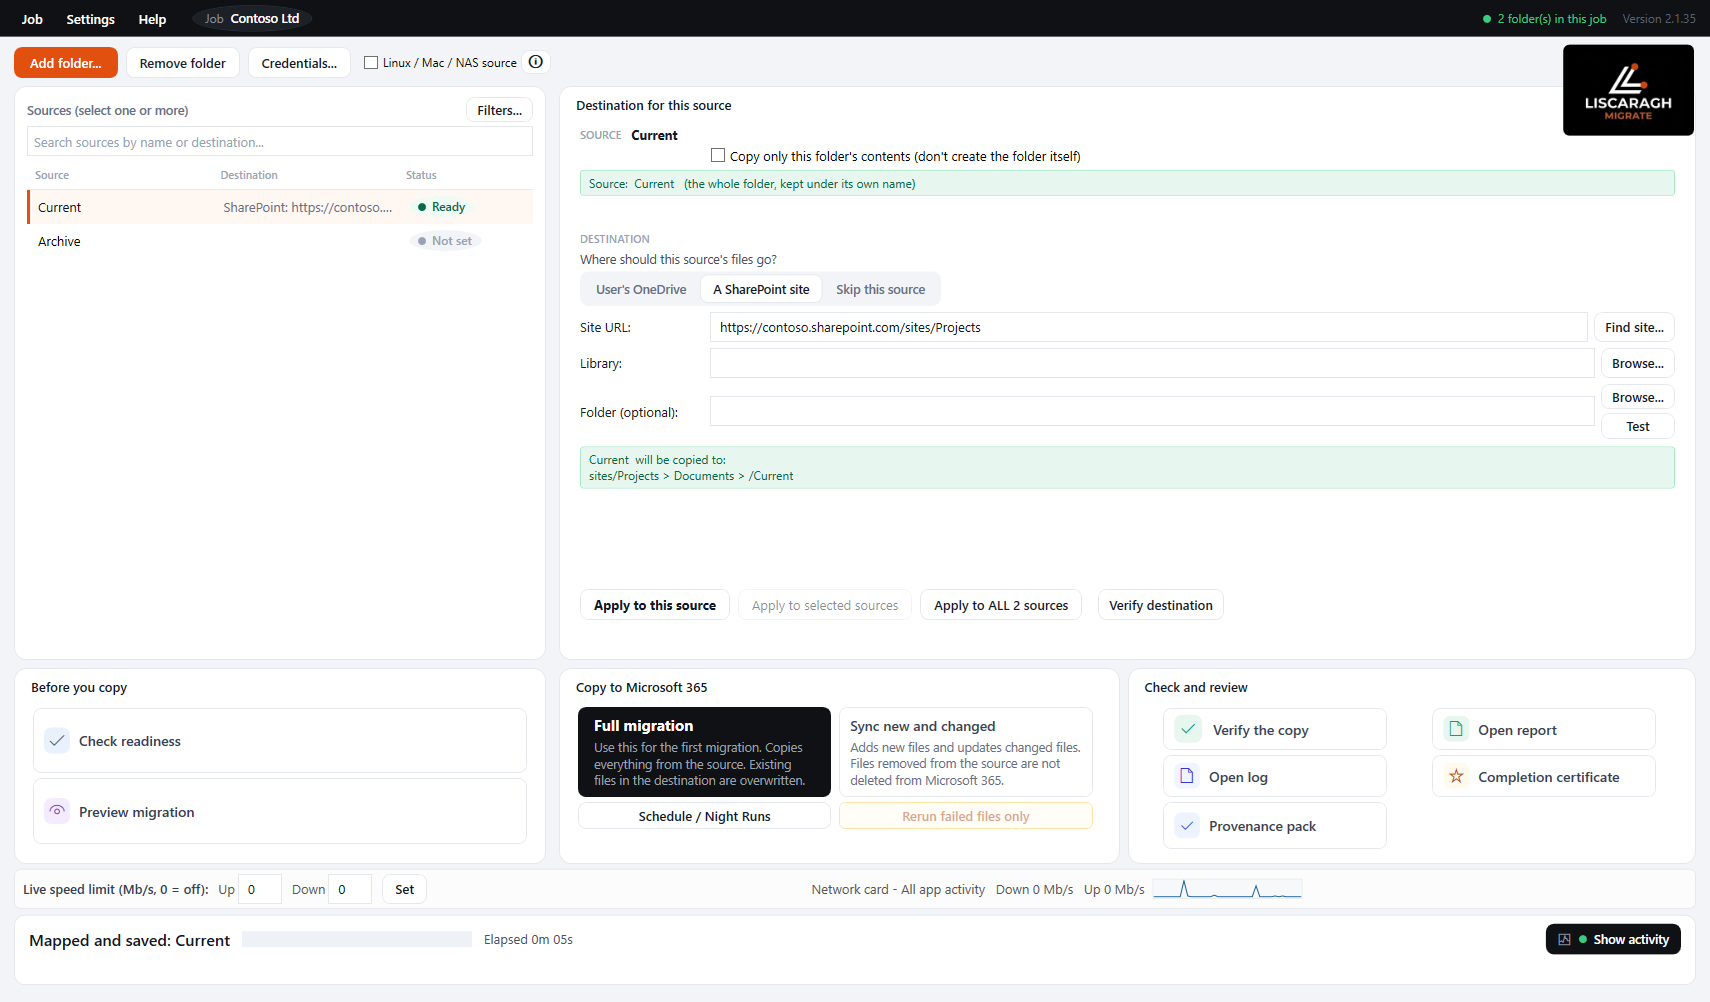
A job with two folders, one mapped to a SharePoint site.
-
Preview (nothing is copied)
Run Preview to see what would move, what would be renamed to satisfy SharePoint's naming rules, and what would be skipped. Nothing is written to the destination. Use it to sanity-check the mapping.
-
Upload all files
Click Upload all files and let it run. Each file is streamed from the source straight into Microsoft 365, with its size checked as it lands to confirm the upload arrived intact; source and destination hashes are also recorded in the audit trail for the record. Progress, the current file, throughput and an estimated time to finish are shown as it works. Large migrations can run for hours; that is normal.
-
Verify and compare
When it finishes, run Verify files arrived to confirm every expected file is present at the destination and matches the source in size, and Compare sizes for a quick size reconciliation. The coloured banner at the bottom is the run's verdict; the report is the full record.
-
Keep the destination up to date
People can keep working in the source while you migrate. Sync new and changed tops the destination up with anything added or changed since the last run. Just before everyone switches over, run one final Sync and Verify.
-
Open the log and report
Every run writes a complete log and a single self-contained HTML report you can archive or send to the client. Use the Open log and Open report tiles. The per-file audit trail is the authoritative record of what happened; see understanding your audit trail and reports for what each one contains.
What each action does
The buttons fall into two groups: actions that change the destination, and read-only checks that never change anything.
Preview
A dry run. Shows what would be copied, renamed or skipped. Writes nothing. Safe to run at any time.
Upload all files (first pass)
The full copy. Every source file is copied into the destination. Use this for the initial migration of an item.
Sync new and changed
Compares the source against the live destination (not a stored record) and copies only what is new or has changed, file by file, by modified date. There is no local state file to go stale, which is what makes a Sync safe to run as many times as you like. Clicking it asks you to choose one of two options, every time, so you always know which behaviour you are getting:
- Add new files only
- Copies files that are not at the destination yet. Never changes or overwrites anything already there. This is the safest top-up, and the right default for most Syncs: if someone has edited a file directly in SharePoint since the migration started, this option leaves their edit alone.
- Update where the source is newer
- Does everything the first option does, and also replaces a destination file when the source copy has a newer modified date. A destination file that is the same age or newer, for example a document someone has since edited in SharePoint, is left alone either way. When to use it: the source is still being actively worked in and you want the destination to catch up to genuine source-side changes, not just fill gaps.
Either way, a Sync only ever adds or repairs; it never deletes from the destination. To force the source version over a newer destination copy (the one case neither Sync option covers), use Upload all files instead, which copies everything unconditionally.
Verify files arrived
Walks the destination and confirms every expected file is present, with its size checked against the source (Office documents are exempt from the size check, since SharePoint can adjust them slightly on save). Read-only. This is your proof the migration is complete.
Compare sizes
A quick reconciliation of source and destination sizes. Read-only, and it needs no licence, so you can run it before you buy.
What Liscaragh Migrate never does
The source is your live system, and people are still working in it while you copy out of it, so the tool is built to be incapable of harming it.
It only ever reads from the source. It cannot create, modify, rename, move or delete anything there. This is enforced in the code, not left to good behaviour.
Files that briefly stage on the migration machine during a copy are encrypted and unreadable, and the key exists only while the run is in flight. Each file is deleted the moment it has uploaded, and is never retained after a successful upload.
Nothing is sent anywhere except to your source and your Microsoft 365 tenant, over encrypted connections. No file or credential passes through any Liscaragh service.
The tool never deletes from the destination. A Sync never deletes files from the destination; it only ever adds files that are missing or repairs ones that are the wrong size.
Filters
Click Filters..., docked above the projects list, to decide what a job copies. It applies to every project in the job, not just the one selected, and takes effect on the next run. Leave a box blank, or a limit at 0, for no restriction.
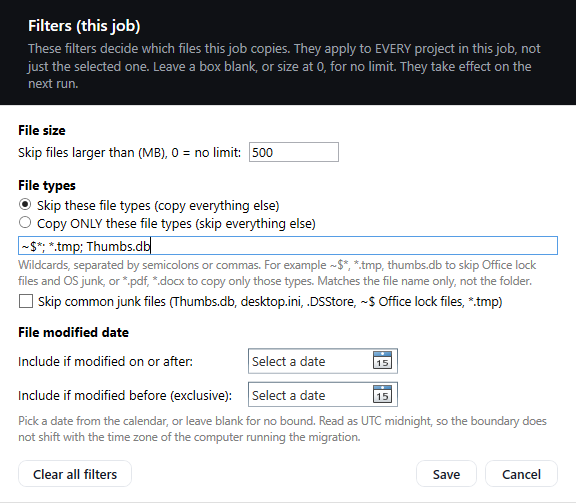
The Filters dialog, with a size limit and a skip pattern set.
- File size
- Skip any file larger than a limit you set, in MB. When to change: defer a handful of very large items to a separate run, for example to get the bulk of a project across first.
- File type
- Two mutually exclusive modes: skip these file types, a list of wildcard patterns (the default catches Office lock files and OS junk such as
~$*,*.tmp,thumbs.dband.DS_Store), or the reverse, copy only these file types, for example*.pdf; *.docxto bring across nothing else. When to change: switch to copy-only for a narrow, targeted migration; add patterns like*.bakor*.oldto the skip list to leave backup files behind. - Modified date
- Include only files modified on or after, and/or before, a date you pick from a calendar. The boundary is read as UTC, so it does not shift with the time zone of the machine running the migration. When to change: useful for a first pass limited to recent activity, with an older-data run to follow.
Performance and tuning
The defaults are chosen to be safe and fast for a typical migration, and most people never change them. They live under Settings > Performance and tuning, and a Reset to defaults button is in that window. Below is what each one does and when you might change it.
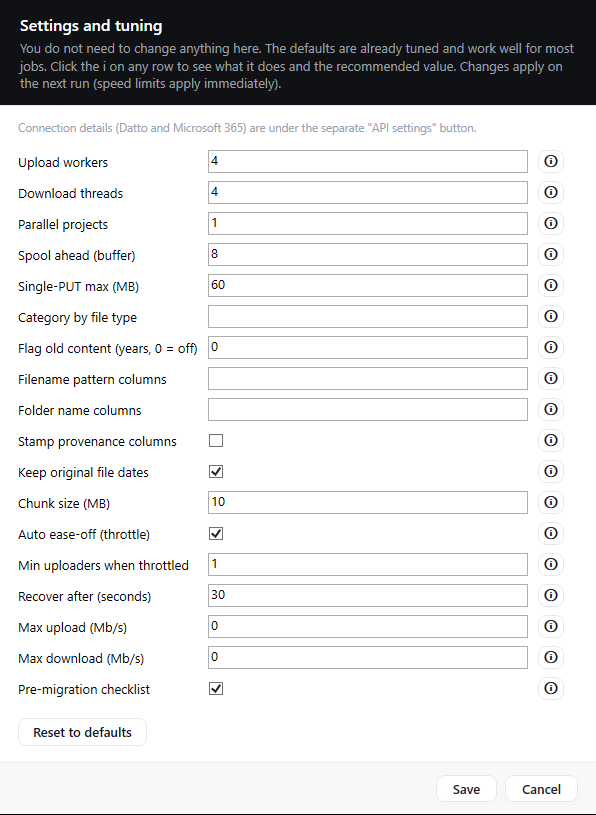
Settings and tuning, on its default values.
- Upload workers default 4
- How many files upload to one destination at the same time. When to change: drop to 2 on a slow or busy connection. Higher than 4 risks Microsoft 365 throttling, which slows the run down rather than speeding it up.
- Download threads default 4
- How many files download from the source at once. When to change: rarely. Downloads only need to stay ahead of uploads, so this seldom needs raising.
- Parallel projects default 1
- How many projects migrate at once, each to a different destination. When to change: leave at 1 unless you understand the risk of running several at once. This is the riskiest dial: each parallel project runs as its own process with its own rate limiter that cannot see the others, so several at once can over-saturate a single shared source account, for example one Datto Workplace tenant, even where each project's destination is a different Microsoft 365 tenant. It does nothing at all for a single project.
- Spool ahead (buffer) default 8
- How many downloaded files are buffered waiting to upload. When to change: almost never. It keeps the upload workers fed. Too low starves them; too high just uses more temporary disk.
- Single-PUT max (MB) default 60
- Files at or under this size upload in one request, which is faster; larger files use a resumable, chunked upload. When to change: rarely. 60 is a safe balance well within Microsoft's limits.
- Chunk size (MB) default 10
- The chunk size used for files above the single-PUT limit. When to change: rarely. Larger chunks mean fewer requests but more to re-send if a chunk fails.
- Auto ease-off when throttled default on
- When Microsoft 365 asks the tool to slow down, it automatically reduces how many files upload at once, then speeds back up when the pressure clears. When to change: leave it on. This is best practice and protects the run without you watching it.
- Minimum uploaders when throttled default 1
- The fewest simultaneous uploads to drop to while being throttled. When to change: 1 is safest and always makes progress. Only raise it if you know the tenant tolerates more.
- Recover after (seconds) default 30
- How long to stay calm before adding an uploader back after throttling. When to change: lower recovers faster but risks bouncing back into throttling; higher is gentler.
- Max upload (Mb/s) default 0 (no cap)
- A cap on how much upload bandwidth the migration uses. When to change: the most useful setting for running during office hours. For example, set 20 on a 50 Mb/s upload line so the client's internet stays usable. The run simply takes longer.
- Max download (Mb/s) default 0 (no cap)
- A cap on download bandwidth from the source. When to change: usually the upload cap is enough. Set this only if pulling from the source is also affecting the client's connection.
Getting help
If something does not look right, use Help > Email support. It builds a support file containing the logs and reports for the job, with API secrets and access tokens stripped automatically, ready to attach to an email to support@liscaragh.com. A sentence on what you expected and what happened instead is all we need to start. If a file has failed, see what happens when files fail, and how to fix it first, most of the time it is a one-click fix.